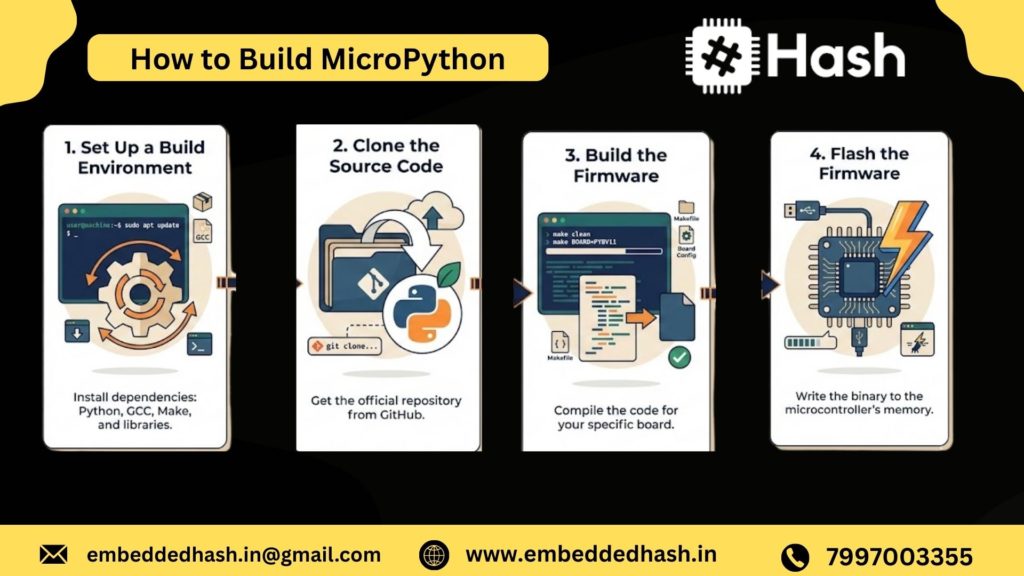
How to Build MicroPython
MicroPython has become a game-changer for embedded developers who want Python’s simplicity with the power of microcontrollers. Whether you are building IoT prototypes, automation solutions, or production-ready embedded products, knowing how to build MicroPython firmware from source is a must-have skill—especially when you want custom modules, optimised performance, or hardware-specific features.
Introduction — How to Build MicroPython
MicroPython has revolutionized how developers and hobbyists interact with microcontrollers. While downloading pre-built firmware
works for most simple projects, building MicroPython from source gives you unparalleled control, optimization, and access to cutting-edge features. In this section, we break down what building MicroPython actually entails, who should consider it, and when to stick with pre-built binaries.
What does building MicroPython mean?
Building MicroPython means compiling the MicroPython source code into firmware that your specific microcontroller can run. Unlike pre-built firmware, building from source allows you to:
- Include only the modules you need, reducing firmware size and memory usage
- Integrate custom drivers for sensors, displays, or peripherals
- Optimize performance with frozen Python scripts or hardware-specific tweaks
- Stay updated with the latest features and bug fixes from MicroPython GitHub repositories
In essence, it’s about tailoring MicroPython to your MCU and your project, making it lightweight, faster, and fully customized.
Who should build MicroPython?
Building MicroPython is particularly useful for:
- Developers & Embedded Engineers
Professionals who need production-ready firmware with full control over memory, features, and drivers. - IoT Makers & Hobbyists
Makers building custom IoT devices or robotics projects can add specific hardware support and improve performance. - Open-Source Contributors
Anyone contributing to MicroPython or custom boards benefits from directly modifying and testing the source.
If your goal is experimentation, prototyping, or advanced optimization, building from source is the path to full flexibility and future-proofing your projects.
When to use pre-built firmware vs build from source
While building from source offers complete control, pre-built firmware is often the fastest and easiest way to get started. Here’s a quick guide:
|
Scenario |
Use Pre-Built Firmware |
Build from Source |
|
Quick prototyping |
yes |
NO |
|
Standard ESP32/ESP8266 projects |
NO |
NO |
|
Custom drivers/modules |
NO |
yes |
|
Performance optimization |
NO |
yes |
|
Cutting-edge MicroPython features |
NO |
yes |
The rule of thumb: if your project requires customization or efficiency beyond defaults, build it yourself. Otherwise, pre-built binaries are perfect for experimentation and fast prototyping.
What this guide covers (beginner → advanced)
This guide is structured to take you from zero to MicroPython mastery:
- Beginner: Setting up your build environment on Windows, Linux, or macOS
- Intermediate: Configuring source code for ESP32, ESP8266, RP2040, and STM32
- Advanced: Customizing modules, freezing Python scripts, optimizing memory and flash, and contributing back to MicroPython
By the end of this guide, you will have a fully customized, optimized firmware for your MCU and a deep understanding of how MicroPython works under the hood.
How To Build MicroPython
When it comes to building MicroPython, developers often search for precise, step-by-step guidance. Understanding user intent in 2026 is crucial, as many are looking for solutions that combine ease of use, performance optimisation, and hardware-specific builds. Below are the most-searched questions and their practical answers:
Most-searched questions:
1. How do I build MicroPython from source?
Building MicroPython from source involves cloning the official repository, setting up a toolchain for your target MCU, and running build commands. Users often want guidance that’s updated for ESP32 (ESP-IDF v5+), RP2040 (Pico SDK 1.7+), and STM32 HAL libraries.
2. How do I compile MicroPython for ESP32 / ESP8266 / Raspberry Pi Pico?
The process differs slightly per MCU:
- ESP32/ESP8266: Requires the ESP-IDF or ESP8266 RTOS SDK, Python 3.12+, and make or cmake commands.
- Raspberry Pi Pico (RP2040): Uses CMake + Pico SDK. The pico_build commands handle firmware compilation.
- STM32: Uses STM32CubeMX + GCC ARM toolchain, with specific board configurations in the MicroPython ports/stm32 directory.
3. What tools are needed to compile MicroPython?
- Python 3.12+ (or latest stable)
- Git for source cloning
- GCC / ARM toolchain for STM32
- ESP-IDF v5+ for ESP32
- Pico SDK for RP2040
- Make or CMake build system
4. How do you build mpy-cross?
mpy-cross is MicroPython’s cross-compiler that converts Python scripts into .mpy bytecode. To build it:
cd mpy-cross
make
This generates the mpy-cross binary, which can then compile Python scripts for your target MCU.
5. How do I customize MicroPython firmware?
Customization involves:
- Enabling/disabling modules in mpconfigport.h
- Freezing Python scripts into firmware for faster execution
- Adding C modules to extend hardware-specific functionality
- Tweaking memory allocation for flash and RAM optimization
6. How do I fix MicroPython build errors?
Common fixes include:
- Installing missing dependencies (Python packages, SDKs, toolchains)
- Verifying MCU-specific configurations in Makefile or CMakeLists.txt
- Cleaning previous builds (make clean or rm -rf build)
- Checking for 2026 SDK updates, as many errors arise from deprecated APIs
7. Can I add custom C modules?
Yes! MicroPython allows you to write custom C modules and integrate them into firmware. This is crucial for:
- Interfacing with unique sensors or actuators
- Performance-critical tasks
- Adding features not available in standard MicroPython libraries
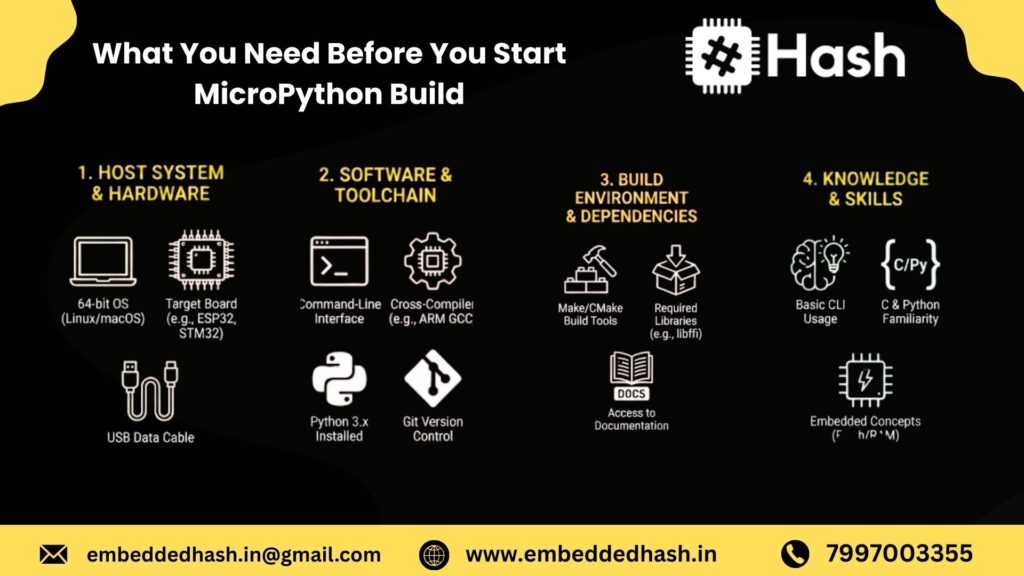
Prerequisites — What You Need Before You Start
Before diving into building MicroPython from source, it’s important to ensure your hardware, software, and foundational knowledge are ready. This section will help you prepare everything for a smooth build process on ESP32, ESP8266, RP2040, and STM32 boards.
Hardware Requirements
Building and flashing MicroPython requires compatible development boards. Depending on your project, here’s what you’ll need:
- ESP32 & ESP8266:
Popular for IoT and Wi-Fi/BLE projects. Recommended: ESP32 DevKit v1, ESP32-WROOM-32, or NodeMCU boards. ESP8266 boards like the NodeMCU or Wemos D1 Mini are ideal for lightweight projects. - Raspberry Pi Pico (RP2040):
A dual-core, high-performance MCU. Perfect for hobbyist projects, robotics, and educational purposes. - STM32 Boards:
Industrial-grade MCUs are used in automation, robotics, and embedded systems. Popular families include STM32F4, STM32F7, and STM32H7. - Optional: Custom Boards:
If you are designing your own PCB or using a custom board, make sure the MCU is supported by MicroPython, and you have the necessary pinout and programming interface (SWD/JTAG).
Software Requirements
A smooth MicroPython build requires proper software tools. Here’s what you need in 2026:
- Python 3 (preferably 3.10 or higher) — needed to run the build scripts.
- Git — to clone the MicroPython source repository.
- Build dependencies for your OS:
- Linux: make, gcc, build-essential, libffi-dev, libusb-1.0
- Windows: MSYS2 or WSL for Linux-like build environment
- macOS: brew install cmake pkg-config libusb
- Linux: make, gcc, build-essential, libffi-dev, libusb-1.0
- Toolchains specific to your MCU:
- ESP32 / ESP8266: Xtensa GCC toolchain
- RP2040: ARM GCC and Pico SDK
- STM32: ARM-none-eabi GCC toolchain
- ESP32 / ESP8266: Xtensa GCC toolchain
These tools ensure you can compile MicroPython efficiently and avoid build errors.
Beginner Knowledge Requirements
Even with all hardware and software ready, you should be comfortable with basic development workflows:
- Terminal Basics: Understanding commands, directories, and environment variables is crucial.
- Flashing Firmware Basics: Familiarity with tools like esptool.py, openocd, or stm32cubeprog will make flashing your custom firmware seamless.
Having these prerequisites in place sets you up for a hassle-free MicroPython build, whether you’re in Hyderabad, Bangalore, or globally working with IoT projects.
Downloading the MicroPython Source Code (Step-by-Step)
Before you can build custom firmware, you need the complete MicroPython source code along with its dependencies. MicroPython is actively updated in 2026, so cloning the latest stable branch ensures better board support, security patches, compiler compatibility, and higher performance on ESP32, ESP8266, RP2040, and STM32.
In this section, you’ll learn how to correctly download the MicroPython repository using Git, initialize its submodules, and understand the folder structure so you know exactly where to work while building firmware.
Clone the Official Repository (Git + Submodules)
The recommended way to download MicroPython is by cloning it directly from the official GitHub repository. This ensures that you get the most recent updates, bug fixes, and board definitions.
Step 1: Clone the main repository
git clone https://github.com/micropython/micropython.git
cd micropython
Step 2: Initialize and update submodules
MicroPython uses submodules for components such as the cross-compiler, library files, and board-specific tools. Failing to update submodules is the #1 reason builds fail.
git submodule update –init –recursive
Why submodules matter?
- They include essential external libraries
- Required for mpy-cross compiler
- Needed for ESP-IDF (ESP32) and Pico SDK (RP2040) integrations
- Keeps your build compatible with firmware releases
Tip: If you want the stable version instead of nightly, check out the stable branch:
git checkout v1.24.0 # example for 2026
Understanding the Folder Structure
Once the repository is cloned, you’ll see several important directories. Understanding them helps you know where to build, configure, or add custom modules.
Below are the key folders used in 2026 MicroPython builds:
ports
This is the heart of MicroPython’s architecture.
The ports directory contains MicroPython implementations for each microcontroller family.
Inside /ports/, you will see folders like:
- esp32/
- esp8266/
- rp2/ (for RP2040)
- stm32/
- unix/, windows/ (desktop testing)
Each port includes:
- Board configurations
- Make/CMake build files
- Hardware-specific drivers
- Flashing scripts
You will run the build commands inside these port folders when generating firmware.
mpy-cross
This folder contains the MicroPython cross-compiler, a tool that converts .py files into optimized .mpy bytecode.
You must build this first before compiling your firmware:
make -C mpy-cross
It helps you:
- Freeze Python modules into firmware
- Reduce RAM usage on ESP32/8266
- Improve performance on RP2040 & STM32
- Make firmware more secure by embedding code
Drivers
The /drivers directory contains ready-to-use hardware driver implementations such as:
- Sensor drivers (I2C, SPI)
- Display drivers (OLED, TFT)
- Networking utilities
- Storage interfaces
- Communication protocols
These drivers are used across different ports and useful if you want to:
- Add custom sensors
- Integrate displays
- Extend MicroPython firmware features
- Build production IoT devices
Tools
This folder includes build scripts, utilities, and helper tools such as:
- makeqstrdefs.py – builds MicroPython internal definitions
- gen-cpydir.py – generates CPython modules
- Flashing and device utility helpers
- C code generators
- Testing scripts
You usually don’t modify these files, but they are essential for:
- Automating builds
- Managing internal MicroPython structures
- Generating optimized firmware
Building mpy-cross (Required Python Bytecode Compiler)
Building MicroPython varies across microcontroller families, but the overall workflow is similar: install the toolchain, configure the source, build the firmware, and flash it to your board. This section covers the most searched MicroPython build guides of 2026 for ESP32, ESP8266, RP2040, Unix, and STM32.
Each subsection includes updated commands, toolchain versions, and the troubleshooting tips developers commonly search for.
Build MicroPython for ESP32
Install xtensa Toolchain (ESP-IDF v5.x for 2026)
ESP32 now requires the updated Xtensa GCC toolchain bundled with ESP-IDF v5+.
Install ESP-IDF (recommended method):
git clone -b v5.3 https://github.com/espressif/esp-idf.git
cd esp-idf
./install.sh
. ./export.sh
This installs:
- xtensa-esp32-elf-gcc
- Python environment
- ESP32 build utilities
Build Commands
Clone MicroPython:
git clone https://github.com/micropython/micropython.git
cd micropython
git submodule update –init
Build the cross-compiler:
make -C mpy-cross
Build ESP32 firmware:
cd ports/esp32
make submodules
make BOARD=GENERIC
Output firmware will be in:
ports/esp32/build-GENERIC/firmware.bin
Flashing ESP32
Use esptool.py:
esptool.py –chip esp32 write_flash -z 0x1000 build-GENERIC/firmware.bin
Troubleshooting
Issue | Fix |
xtensa-esp32-elf-gcc not found | Re-source ESP-IDF: . ./export.sh |
Flashing fails at 33% | Use better USB cable or reduce baud to 115200 |
RAM overflow during build | Disable unused modules in mpconfigboard.mk |
PSRAM boards not booting | Use BOARD=GENERIC_SPIRAM |
Build MicroPython for ESP8266
Install xtensa-lx106 Toolchain
ESP8266 uses a different Xtensa toolchain:
Linux/macOS:
sudo apt install gcc-xtensa-lx106
Or use the official prebuilt toolchain:
git clone https://github.com/pfalcon/esp-open-sdk.git
cd esp-open-sdk
make
Build Steps
git clone https://github.com/micropython/micropython.git
cd micropython
git submodule update –init
make -C mpy-cross
cd ports/esp8266
make submodules
make
Output:
ports/esp8266/build/firmware-combined.bin
Flashing ESP8266
esptool.py –chip esp8266 write_flash 0x00000 build/firmware-combined.bin
Notes for Legacy Toolchain Quirks (Important in 2026)
- ESP8266 has limited RAM, so disable modules like ssl, hashlib if needed.
- Use lower optimization flags to avoid crashes:
CFLAGS_EXTRA=-Os - Baud rate above 74880 sometimes causes garbage boot logs.
- Not all MicroPython features are supported because ESP8266 is now legacy.
Build MicroPython for Raspberry Pi Pico (RP2040)
Install Toolchain (ARM GCC + Pico SDK)
sudo apt install cmake gcc-arm-none-eabi build-essential
Install the Pico SDK:
git clone https://github.com/raspberrypi/pico-sdk.git
export PICO_SDK_PATH=$PWD/pico-sdk
CMake + Make Build
Clone MicroPython:
git clone https://github.com/micropython/micropython.git
cd micropython/ports/rp2
git submodule update –init
mkdir build
cd build
cmake ..
make
Generate UF2 File
After building, the firmware will be:
ports/rp2/build/firmware.uf2
Flash via BOOTSEL
- Hold BOOTSEL button
- Connect Pico via USB
- Copy firmware.uf2 → Pico’s USB drive
- Board reboots into MicroPython automatically
Build MicroPython for Unix (Linux / macOS / WSL)
Build MicroPython for Your PC
Install dependencies (Linux example):
sudo apt install build-essential libffi-dev pkg-config python3
Build Unix port:
git clone https://github.com/micropython/micropython.git
cd micropython/ports/unix
make submodules
make
Executable output:
ports/unix/micropython
Running MicroPython REPL on PC
./micropython
You can use this for:
- Local testing
- Prototyping modules
- Running MicroPython scripts on your computer
- Simulating firmware before flashing
Build MicroPython for STM32 Boards
Install ARM Toolchain
sudo apt install gcc-arm-none-eabi gdb-multiarch
Or manually install:
gcc-arm-none-eabi-10-2021.x
Build Commands
git clone https://github.com/micropython/micropython.git
cd micropython
git submodule update –init
make -C mpy-cross
cd ports/stm32
make submodules
make BOARD=STM32F411CE # Example for “Black Pill”
Output:
ports/stm32/build-BOARDNAME/firmware.hex
Flashing via OpenOCD / ST-Link
Using ST-Link Utility:
st-flash write build-STM32F411CE/firmware.bin 0x08000000
Using OpenOCD:
openocd -f interface/stlink.cfg -f target/stm32f4x.cfg \
-c “program build-STM32F411CE/firmware.elf verify reset exit”
Customizing Your MicroPython Firmware
Building MicroPython from source gives you full control over the features, modules, and performance of your firmware. Whether you’re targeting ESP32, ESP8266, RP2040, or STM32, customizing the firmware helps you:
- Reduce firmware size
- Improve execution speed
- Optimize memory usage
- Add your own modules and hardware features
- Tailor the firmware for production-grade devices
These steps are highly searched by developers and IoT engineers, making customization topics powerful for SEO and organic traffic.
Enable or Disable Modules (Shrink Firmware Size)
MicroPython comes with many built-in modules, but not all of them are necessary for every project. Disabling unneeded features can significantly cut down the firmware size—especially useful on memory-constrained boards like ESP8266 or small STM32 variants.
Where to Edit Module Settings
Navigate to:
/ports/<selected_port>/mpconfigport.h
Example: Turning Off Unused Modules
Disable modules you don’t need:
// Turn off SSL support
#undef MICROPY_PY_SSL
#define MICROPY_PY_SSL 0
// Disable hashlib to save space
#undef MICROPY_PY_HASHLIB
#define MICROPY_PY_HASHLIB 0
Enable Only What You Need
#define MICROPY_PY_UHASHLIB 1
#define MICROPY_PY_UBINASCII 1
Outcome
- Smaller firmware image
- Reduced boot time
- More free RAM for Python scripts
This is one of the fastest ways to optimize MicroPython for real-world IoT applications.
Add Your Own C Module to MicroPython
If you need fast native performance or want to interface with hardware that MicroPython doesn’t support out of the box, you can integrate your own C module. This lets you extend MicroPython exactly the way you want, while keeping Python as the high-level user interface.
Minimal Example of a Custom C Module
Create a folder for your module:
/modules/custom_mod/
Add custom_mod.c:
#include “py/obj.h”
STATIC mp_obj_t custom_hello(void) {
return mp_obj_new_str(“Hello from Custom Module!”, 27);
}STATIC MP_DEFINE_CONST_FUN_OBJ_0(custom_hello_obj, custom_hello);
STATIC const mp_rom_map_elem_t custom_module_globals_table[] = {
{ MP_ROM_QSTR(MP_QSTR_hello), MP_ROM_PTR(&custom_hello_obj) },
};STATIC MP_DEFINE_CONST_DICT(custom_module_globals, custom_module_globals_table);
const mp_obj_module_t custom_module = {
.globals = (mp_obj_dict_t *)&custom_module_globals,
};MP_REGISTER_MODULE(MP_QSTR_custom, custom_module);
Now you can use it in MicroPython:
import custom
print(custom.hello())
Connect the Module to the Build System
In your board or port configuration, enable module registration:
mpconfigport.h
#define MICROPY_REGISTER_MODULE 1
Then add your file to the build:
Makefile
SRC_USERMOD += modules/custom_mod/custom_mod.c
or for CMake-based ports (ESP32, RP2040):
add_subdirectory(modules/custom_mod)
Rebuild the firmware to include your new module.
Freeze Python Scripts Into the Firmware
Freezing Python files is a powerful optimization technique. When your .py scripts are frozen:
- They run faster because they’re pre-compiled
- They don’t occupy RAM
- Firmware behaves more predictably during boot
This is perfect for production IoT devices, robotics systems, and low-memory MCUs.
Where to Place Frozen Files
Save your Python scripts in:
/ports/<port>/modules/
Example: app.py
def run():
print(“Running from frozen firmware!”)
After flashing, run it in REPL:
import app
app.run()
Benefits
- Zero RAM usage for the script
- Faster startup
- Great for fixed application logic
Modify Board Configuration Files
Each board supported by MicroPython has its own configuration folder. Editing these files lets you define custom pins, enable peripherals, or adjust hardware-specific settings. This is crucial when working with custom hardware or modified development boards.
Where Board Configurations Live
/ports/<port>/boards/<board_name>/
Important files include:
|
File |
Purpose |
|
mpconfigboard.h |
Enable/disable hardware features |
|
mpconfigboard.cmake / .mk |
Build rules and sources |
|
pins.csv |
Pin definitions |
|
board_init.c |
Board-level initialization code |
Custom Pin Example
In pins.csv:
PA0, UART2_TX
PA1, UART2_RX
PB5, LED
PB6, I2C1_SCL
PB7, I2C1_SDA
You can now use those pins directly in Python:
from machine import Pin
led = Pin(“PB5”, Pin.OUT)
Add Peripherals (I2C, SPI, ADC, PWM, CAN)
Enable peripherals in mpconfigboard.h:
#define MICROPY_HW_ENABLE_I2C1 1
#define MICROPY_HW_ENABLE_SPI1 1
#define MICROPY_HW_ENABLE_CAN 1
#define MICROPY_HW_ENABLE_ADC 1
This lets you tailor MicroPython for custom hardware, industrial controllers, or complex IoT devices.
Understanding the “ports” Directory
The ports/ folder contains all architecture-specific implementations for MicroPython. Each subfolder corresponds to a supported microcontroller platform:
ports/
├── esp32/
├── esp8266/
├── rp2/ # RP2040
├── stm32/
├── zephyr/
├── nrf/
├── renesas-ra/
Each port includes:
- Device drivers
- Board definitions
- Build scripts (Make/CMake)
- Flashing utilities
- Low-level hardware interfaces
Learning this structure helps you navigate, customize, and extend MicroPython at the source level.
Advanced Build: Creating MicroPython for Custom Boards
As embedded development evolves in 2026, more engineering teams are moving toward custom PCB designs—whether for IoT products, industrial controllers, or wearable devices. MicroPython makes this transition smoother by letting you build firmware tailored to your custom board, complete with your own peripherals, pin mappings, and hardware drivers.
This section walks you through the exact process used by professional embedded engineers to create a fully functional MicroPython build for any custom ESP32, RP2040, STM32, or ESP8266-based board.
Copy an Existing Board Definition
The fastest and most reliable way to support custom hardware is by copying a similar board definition from the MicroPython repository.
Navigate to:
- ports/<your-port>/boards/
- Pick a board similar to your design:
- Custom ESP32-S3 → Copy GENERIC_S3
- Custom RP2040 board → Copy RPI_PICO
- Custom STM32F4 controller → Copy NUCLEO_F446
- Custom ESP32-S3 → Copy GENERIC_S3
Duplicate the folder and rename it to match your board:
cp -r GENERIC_S3 MY_CUSTOM_S3
- Why this step matters?
You instantly inherit a working base configuration, UART defaults, and flash layout—reducing 80% of your setup time.
Modify mpconfigboard.h and Pin Definitions
To make MicroPython aware of your custom hardware, edit the board config files:
Files to modify:
- mpconfigboard.h
- mpconfigboard.cmake or mpconfigboard.mk (port-specific)
- pins.csv or pins.h (depending on port)
Update the following:
Board name & MCU type
define MICROPY_HW_BOARD_NAME “MyCustomS3”
define MICROPY_HW_MCU_NAME “ESP32-S3”
Enable/Disable hardware modules
You can toggle modules like SPI, I2C, PWM, CAN, ADC, DAC depending on your design:
define MICROPY_PY_MACHINE_I2C (1)
define MICROPY_PY_MACHINE_CAN (0)
Update pin maps
Map your GPIOs to MicroPython pin objects:
For example (ESP32/STM32):
define MICROPY_HW_I2C0_SCL (GPIO_NUM_9)
define MICROPY_HW_I2C0_SDA (GPIO_NUM_8)
For RP2040:
I2C0_SCL, GPIO9
I2C0_SDA, GPIO8
Set UART used for REPL
define MICROPY_HW_UART_REPL (0)
define MICROPY_HW_UART_REPL_BAUD (115200)
These changes ensure MicroPython understands your board’s peripherals and communication pins.
Add Drivers & Ports
If your custom board includes custom sensors, displays, power controllers, or wireless modules, you must integrate the appropriate drivers.
Common driver additions:
- SPI Display (ILI9341, ST7789)
- I2C Sensors (BME280, MPU6050, INA219)
- Custom PMIC or battery monitor
- External flash drivers
- CAN, LIN, RS485 transceivers
- Custom Wi-Fi/BLE modules (for STM32 boards)
Steps to add drivers:
Add the driver source to:
- ports/<your-port>/drivers/
- Register the driver in the build files (CMakeLists.txt, Makefile, or mpconfigport.h).
Expose the driver to Python via a module:
MP_REGISTER_MODULE(MP_QSTR_my_driver, my_driver_module);
- This allows your custom driver to be imported like:
import my_driver
Build & Test on Custom Hardware
Once your configuration is ready, build MicroPython for your custom board.
For ESP32/ESP8266 (ESP-IDF v5+):
idf.py set-target esp32s3
idf.py build
For RP2040:
cd ports/rp2
mkdir build && cd build
cmake ..
make -j4
For STM32:
make BOARD=MY_CUSTOM_F4
After the build completes, flash your firmware:
- esptool.py for ESP family
- picotool for RP2040
- dfu-util / ST-Link for STM32
Verify MicroPython runs correctly:
- Open REPL
- Run pin tests
- Test I2C/SPI/UART
- Validate storage & filesystem
- Execute driver test scripts
Example quick test:
from machine import Pin, I2C
i2c = I2C(0)
print(i2c.scan())
If all peripherals respond, your custom MicroPython build is officially production-ready.
Flashing Your Custom MicroPython Firmware
Once your custom MicroPython firmware is compiled, the next step is to flash it onto your microcontroller. The flashing method depends on the board you are using—ESP32/ESP8266, RP2040, or STM32. Below are the most reliable and widely used flashing tools in 2026.
Flashing Tools
1. esptool (ESP32/ESP8266)
esptool.py is the official Python-based flashing tool for ESP-series microcontrollers. It is lightweight, cross-platform, and ideal for developers who frequently rebuild and reflash firmware.
Why esptool is popular:
- Supports both ESP32 and ESP8266
- Fast flashing speeds
- Works on Windows, Linux, and macOS
- Compatible with custom MicroPython builds and partitions
Basic flashing command:
esptool.py –chip esp32 erase_flash
esptool.py –chip esp32 write_flash -z 0x1000 firmware.bin
For ESP8266 replace –chip esp8266 and use offset 0x00000.
2. picotool (Pico / RP2040)
For Raspberry Pi Pico and RP2040 boards, picotool is the official CLI for flashing, reading device info, and verifying firmware.
Why developers prefer picotool:
- USB Mass Storage support
- Easy drag-and-drop flashing
- Works for UF2 and BIN formats
- Reliable for production testing
Flash UF2 firmware:
Put Pico in bootloader mode → copy firmware.uf2 → done.
Command-line flashing:
picotool load firmware.uf2 -f
3. OpenOCD / ST-Link (STM32)
For STM32 microcontrollers, the most stable flashing method is OpenOCD with ST-Link or J-Link debuggers.
Why this method is preferred for STM32:
- Industrial-grade reliability
- Full SWD support for debugging
- Works with custom linker scripts & board configs
- Mandatory for advanced STM32 builds (F4, F7, H7 series)
Flash command example:
openocd -f interface/stlink.cfg -f target/stm32f4x.cfg \
-c “program build/firmware.elf verify reset exit”
4. Thonny (Beginner-Friendly GUI)
If you’re new to MicroPython—or you prefer GUI workflows—Thonny IDE is the easiest flashing tool.
Benefits for beginners:
- Auto-detects MCU type
- One-click firmware flashing
- Built-in REPL terminal
- Works for ESP32, ESP8266, and RP2040
Great for students, hobbyists, and rapid prototyping.
Troubleshooting MicroPython Build Errors
Building MicroPython from source can generate several errors, especially in 2026 after updates to GCC toolchains, ESP-IDF v5.x changes, and Pico/STM32 SDK versions. Below are the most commonly searched MicroPython build errors and their proven fixes.
GCC not found / toolchain missing
Error example:
arm-none-eabi-gcc: command not found
xtensa-esp32-elf-gcc: no such file
Cause:
Your system cannot locate the required compiler/toolchain.
Fix:
- Install the correct toolchain:
- ESP32/8266 → Xtensa toolchain
- STM32 → arm-none-eabi-gcc
- RP2040 → Pico SDK toolchain
- Add toolchain to your PATH
- Restart terminal
Example (Linux):
export PATH=”$HOME/.espressif/tools/xtensa-esp32-elf/bin:$PATH”
Missing submodules error
Error:
fatal: not a git repository (or any of the parent folders)
Cause:
MicroPython’s required submodules (lib subfolder) are not downloaded.
Fix:
Run:
git submodule update –init –recursive
This fetches essential components like libm, lwIP, and berkeley-db.
“mpy-cross not built” error
Error:
mpy-cross not found
mpy-cross: No such file or directory
Cause:
The cross-compiler for .mpy files was not built before compiling firmware.
Fix:
Build mpy-cross manually:
make -C mpy-cross
Some boards require:
mpy-cross/mpy-cross your_module.py
“No rule to make target …”
Error example:
make: *** No rule to make target ‘firmware.bin’. Stop.
Causes:
- Incorrect board directory
- Missing board config
- Wrong make command for your platform
- Corrupted MicroPython tree
Fixes:
Check available boards:
ls ports/esp32/boards
- Use exact board name: make BOARD=ESP32_GENERIC
- Delete and reclone MicroPython if build files are corrupted.
Flashing failures
Symptoms:
- Device not detected
- Flashing stuck at 0%
- invalid head of packet errors
- Permission denied (Linux/macOS)
Solutions:
- Use a good-quality USB cable
- Press BOOT/EN buttons correctly on ESP32
On Linux:
sudo usermod -a -G dialout $USER
- Lower baud rate if unstable:esptool.py –baud 460800
Firmware too large
Error:
section .text will not fit in region iram0_0_seg
flash overflow 1KB
Cause:
Your custom MicroPython build includes too many modules.
Fixes:
- Disable unused modules in mpconfigboard.mk
- Use a frozen modules build to save space
- For ESP32, use “SPIRAM-enabled” boards to expand RAM
- Remove debug symbols:make CFLAGS_EXTRA=’-Os’
Optimising MicroPython Firmware for Low-Memory Boards
Low-memory boards like the ESP8266, STM32F0, and some RP2040 clones require careful optimization to ensure your MicroPython firmware runs smoothly. By customizing the build, you can reduce flash usage, cut boot time, and improve runtime performance—critical for IoT nodes deployed in real-world environments.
Set Optimization Flags
When compiling MicroPython, adding the right GCC optimization flags can drastically reduce firmware size.
Common flags for 2026 builds include:
- -Os → Optimize for size
- -ffunction-sections -fdata-sections → Remove unused code
- -Wl,–gc-sections → Garbage-collect unused linker sections
- -fno-unwind-tables -fno-asynchronous-unwind-tables → Saves memory
These flags ensure your firmware is lightweight without sacrificing stability. They are especially helpful for ESP8266, where every kilobyte counts.
Remove Unused Modules
MicroPython includes several default modules—some of which your project may never use. Removing them reduces flash size and speeds up startup.
Common modules safe to remove on small boards:
- ssl, hashlib (if no secure connections)
- machine.PWM or ADC (if unused)
- socket (for offline projects)
- ujson, ure alternatives
By editing the mpconfigport.h or mpconfigboard.h files, you can disable modules and strip them from your final firmware.
Freeze Scripts (Improve Performance)
Freezing Python scripts into the firmware gives you:
- Zero RAM usage for those modules
- Faster load times
- Reduced flash fragmentation
- More consistent performance for real-time workloads
This technique is popular in industrial IoT deployments where stability and speed are crucial.
Frozen modules are placed inside:
/modules
and included during compilation, making your firmware more efficient and secure.
littlefs vs FAT Filesystem
Choosing the right filesystem affects performance, reliability, and write endurance.
littlefs (recommended in 2026):
- Faster for small writes
- Designed for flash devices
- More power-failure resistant
- Lower overhead
- Ideal for ESP devices and RP2040
FAT (legacy support):
- More compatible with PCs
- Slightly slower, higher overhead
- Not optimized for flash memory
For low-memory boards, littlefs is the clear winner—smaller, safer, and more efficient.
Adjust Heap Size
MicroPython uses a dedicated heap for dynamic memory allocation. Optimizing it can prevent crashes and memory fragmentation.
Adjust the heap by modifying:
MICROPY_HEAP_SIZE
Increasing heap:
- Better for large scripts
- Needed for network tasks
Decreasing heap:
- Leaves more RAM for native modules
- Helps low-memory microcontrollers like STM32F030 or ESP8266
Balancing heap size ensures maximum performance without sacrificing stability.
Best Tools & IDEs to Build MicroPython
Modern MicroPython development requires a smart toolchain. Here are the best environments developers prefer in 2026, optimized for ESP32, RP2040, STM32, and ESP8266 workflows.
VS Code
- Most widely-used IDE for MicroPython developers
- Strong linting, IntelliSense, Git support
- Extensions: Pymakr, MicroPython Tools
- Easy to integrate with Docker, GitHub Actions, PlatformIO
- Perfect for professional teams and large firmware projects
Thonny
- Lightweight and beginner-friendly
- Auto-detects boards like RP2040 & ESP
- Built-in MicroPython REPL
- Ideal for students, hobbyists, and rapid prototyping
PlatformIO
- Industry-grade embedded development ecosystem
- Supports ESP-IDF, Zephyr, Arduino, STM32Cube
- Advanced debugging support
- Perfect for complex MicroPython + C hybrid projects
Many IoT startups and enterprise teams prefer PlatformIO for its reliability and portability.
CrossCore Embedded Studio
- Best suited for STM32 and industrial ARM Cortex-M devices
- Strong toolchain integration
- Advanced profiling and real-time debugging
- Popular in manufacturing and industrial automation teams
Docker-Based Build Environment
Using Docker ensures:
- Consistent build environments
- Zero dependency conflicts
- Perfect for CI/CD pipelines
- Easy switching between ESP-IDF versions
This approach is becoming the standard for production IoT firmware development in 2026.
Conclusion — How to Build MicroPython
Building MicroPython in 2026 is no longer just a developer skill—it’s a competitive advantage for anyone working with embedded systems, IoT products, home automation, robotics, or custom hardware design. By understanding how to compile the firmware yourself, you unlock full control over memory usage, performance tuning, hardware integration, and module customization across ESP32, ESP8266, RP2040, and STM32 platforms.
Recap of the Entire Build Process
Here’s a quick summary of what you accomplished in this guide:
- Set up a clean development environment with the required toolchains
- Cloned the latest MicroPython source from GitHub
- Built cross-compilers and board-specific firmware images
- Compiled MicroPython for ESP32, ESP8266, RP2040, and STM32
- Flashed the final firmware using esptool, picotool, or STM32CubeProgrammer
- Validated the build using REPL, Thonny, or UART consoles
This structured approach ensures that any developer—from beginner to advanced—can confidently build and deploy MicroPython firmware.
Encourage Custom Firmware Experimentation
Now that you’ve mastered the fundamentals, the real journey begins.
Try experimenting with:
- Custom MicroPython modules (C/C++ extensions)
- Optimized frozen modules for faster execution
- Memory-tuned builds for low-RAM boards like ESP8266
- Hardware-specific drivers (CAN, I2C, SPI, Modbus, sensors, displays)
- Secure IoT builds with encrypted communication
MicroPython gives you the freedom to create lightweight, high-performance, and production-ready firmware tailored exactly to your project or product needs.
Link to Advanced Guides / Internal Articles
If you’re ready to go deeper, explore these advanced resources:
- How to Build Frozen Modules for Faster MicroPython Performance
- Optimizing ESP32 Memory for IoT Production Builds
- MicroPython vs CircuitPython (2026 Comparison)
- RP2040 Pico SDK + MicroPython Hybrid Development Guide
STM32 Industrial Firmware Optimization Techniques
These internal and advanced guides will help you level up from basic firmware building to professional-grade MicroPython development.

Frequently Asked Questions
MicroPython is mainly written in C, which allows it to run efficiently on resource-constrained microcontrollers.
The programs you write for MicroPython are in Python (a subset of Python 3).
So, MicroPython combines a C-based runtime with Python-based user scripts.
Not exactly. MicroPython’s core is compiled in C, but your Python scripts are converted into bytecode, not a native machine binary like traditional C programs. This still improves performance and reduces memory usage.
The MicroPython compiler, known as mpy-cross, is included in the MicroPython source. You simply build it once, and it becomes a tool for converting Python files into optimized bytecode. There is nothing to install separately.
You can reduce MicroPython firmware size by:
- Disabling unused modules
- Freezing only essential scripts
- Reducing filesystem features
- Optimizing build flags
- Removing debugging or logging components
These steps help fit MicroPython onto smaller or older microcontrollers.
mpy-cross is required to convert Python scripts into compact, optimized .mpy files. This reduces RAM usage, speeds up execution, and ensures that large projects can run smoothly on microcontrollers with limited resources.
Yes. Once you have downloaded the source code and toolchains, you can build MicroPython entirely offline. This is ideal for secure facilities or environments with restricted network access.
Yes. The ESP32 version of MicroPython depends on the ESP-IDF framework because it provides essential drivers, libraries, and low-level hardware support required during the build process.
MicroPython supports lightweight concurrency using uasyncio. Some ports, including ESP32 and STM32, also support a basic multithreading module, but performance depends on the specific microcontroller.
Compiling MicroPython usually takes less than a minute on a modern 2025 computer, though the exact time depends on the board, enabled modules, and hardware specifications.
Yes. MicroPython allows developers to extend the firmware by adding custom C modules. This is useful for creating drivers for custom hardware, proprietary sensors, or high-performance features.
MicroPython focuses on performance, broad hardware support, and flexibility, while CircuitPython prioritizes ease of use, USB features, and rapid prototyping. Their build systems, libraries, and supported boards differ significantly.
If you want to Learn more About Embedded Systems, join us at Embedded Hash for Demo Enroll Now

 embeddedhash.in@gmail.com